If you want to connect your devices to your Wi-Fi network, but you can’t find a WPS button on the device, there is no need to worry. There are several ways to connect to the Wi-Fi network without having to use WPS.
In this guide, we’ve provided practical steps on how to connect a Wi-Fi extender or a printer, or just about any other device to your Wi-Fi network without using WPS.
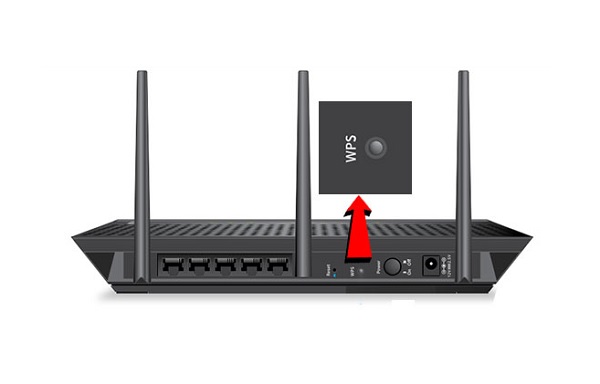
Where Is the Wps Button On a Router?
The WPS button is usually located on the back of your router. It should be easy to find it as it is often labeled with “WPS” or “Wi-Fi Protected Setup”. If you cannot find the WPS button, you can check your router’s documentation.
Setting Up Your Wireless Extender Without WPS
These steps are specific to users of the Netgear Extender. Your own WiFi extender might have different steps so you might want to read through the user manual before following them. However, the steps are generally the same.
For folks that don’t have a WPS button on the hub/router, there is an easy way to use an internet browser to configure the extender without it.
However, before you follow these instructions, you need to check to make sure your computer is not connected to the internet. If so, you need to unplug its Ethernet cable or reconnect to your Wi-Fi network.
With the WPS button, the only option is to use a web browser to log in to the extender and set up the WiFi connection to your existing WiFi router.
To use a web browser to connect the extender to your WiFi router;
Using a WiFi network manager on a computer or WiFi device, find and connect to the extender WiFi network NETGEAR_EXT.
- Once the connection with the computer or WiFi device has been established, the Device Link LED will light up.
- You will have to launch web browser and enter the web address in the address field of the browser,
- The New Extender Setup screen will be displayed.
- Click the NEW EXTENDER SETUP button. If this is your first time logging into the extender, you will find the Create Account screen. If it does not display, then you would have to visit www.mywifiext.net.
- Fill in the fields on the Create Account screen and click the NEXT button.
- When done, you will be directed to select your country or region from the Regional Settings menu and click the NEXT button.
- After that, you need to click the WIFI RANGE EXTENDER button. The extender will scan for WiFi networks in your area and displays a list.
- Choose your WiFi network to extend and click the NEXT button. With the extender, you can choose to extend both WiFi bands. If not, you need to clear the 2.4 GHz WiFi Networks or the 5 GHz WiFi Networks check box.
- In the Password (Network Key) field, you will be required to enter the existing WiFi network password or security key and click the NEXT button.
- Set the network name (SSID) and password for your new extender WiFi network, and then click the NEXT button.
- Go to the WiFi network manager on the computer or WiFi device. From there, you should connect to the new extended WiFi network. If you have more than one device, you will have to repeat this step for all of your computers and WiFi devices.
- Click the CONTINUE button. A message will be displayed confirming that the extender is connected to the new extended WiFi network.
How To Connect Printer To Wifi Without WPS Button
To connect a printer to WiFi without a WPS button, you will need to find the printer’s manual and follow the instructions.
Whether you’re using a Canon printer or another model, each printer is different, so the steps would be different. This makes it important to consult your printer’s manual for specific instructions. In general, the right thing to do would be to connect the printer to your computer via USB and then enter the WiFi password.
Connecting a Printer to a Wireless Network Without Using a WPS Button doesn’t require a learning curve.
To do this, you need to:
- Click the Wireless icon in the Control Panel,
- From there, you can access the printer’s settings, either from the Network menu or from the Wireless tab.
- If you’re using older equipment, it could be possible that it is unable to support WPS due to the fact that some manufacturers have phased it out completely.
- You will need to press WPS.
- When done, your router will search for and attempt to pair your device with it automatically.
- A scannable QR code, which can be used to sign in with a device that supports WPS, usually comes with those devices.
- Enter the WPS pin code into the printer’s settings.
- To find the code, go to the printer’s settings menus and search under WiFi and network options
- Using the Wi-Fi Protected Setup (WPS) button on your printer, you should be able to easily connect to your wireless network.
No WPS Button On Router To Connect Canon Printer
Depending on the model you’re using, some Canon printers do not come with a Wi-Fi Protected Setup (WPS) button. If your Canon printer does not have a WPS button, you can still connect it to your wireless router by following these steps:
- Check and confirm that your Canon printer is turned on. Then check if it is connected to the same wireless network as your router.
- Go to your router and look for a button or link labeled “Add Device” or “Add Printer.”
- The instructions will differ from router to router so you need to check for the specific instructions on your router to add your Canon printer to the wireless network.
- With your Canon printer added to the wireless network, you should be able to print wirelessly from it.


