Ninja blenders are top-rated and have cult followers. They offer users unrivaled incredible performance and longevity. However, most users do not enjoy the best of their appliances because they need to become more familiar with the parts.
Beyond enjoying maximum performance, learning about the component will help you prevent problems and diagnose complications if they eventually arise.
In this guide, we’ll show the Ninja blender diagram and explicitly explain the parts’ functions.
Ninja Blender Parts Diagram
There are different types of Ninja blenders. While some are bulky, others are compact and ideal for everyday tasks. However, the designs are similar, and they all work in the same manner.
Certain parts are present in an average Ninja blender. They range from significant components to smaller pieces, all working together. Each member serves crucial functions, and maintaining them will enable the blender to function well.
Here’s a diagram of a typical Ninja blender showing all the relevant components:
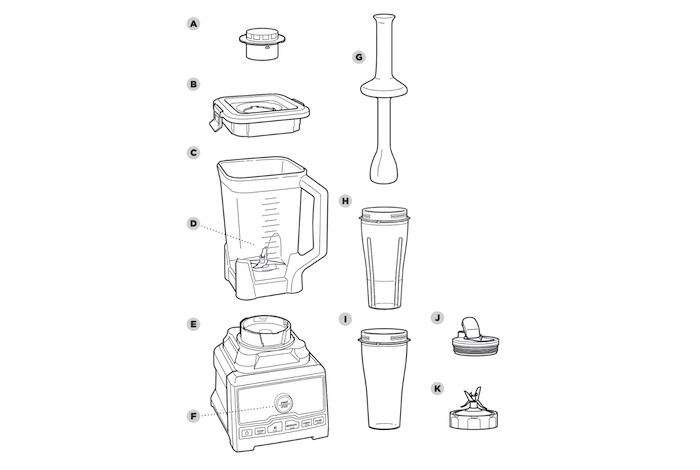
A. Lid Cap
B. Pitcher Lid
C. 72 OZ Pitcher
D. Bottom Blades
E. Motor Base
F. Activation Dial
G. Tamper
H. Double-Walled To-Go Tumbler
I. 24 Oz Single-serve Cup
J. Spout Lid
K. Pro Extractor Blades Assembly
Ninja Blender Parts Explained
Now that you’ve known the essential components of the Ninja Blender, it’s crucial to learn how they work. Knowledge of the blender parts will help immensely when working in the kitchen and prevent electrical damage and accidents.
Continue reading to understand the function of each component.
Blender Jar or Pitcher
The blender jar serves as the container for the ingredients. On top of the main base, which contains the motor and blade assembly, the blender jar rests firmly or is secured by a lock.
The blender jar bottom is usually open to enable the blade to access its inside. The blender jars are generally glass but, in some cases, metal or plastic. A high-end blender will have features like tempered glass blender jars and measurement markings on the side.
If a blender’s pitcher is full of ingredients, it will not work correctly, which is one disadvantage. Most manufacturers advise only filling the blender about three-quarters of the way full to allow room for the components to move around freely.
The Blender Lid
The Blender Lid is another critical component that’s easy to understand. Your blender’s lid keeps the ingredients in the jar. The need for a cover is obvious when powerful blades beat your ingredients at breakneck speed.
It’s crucial to ensure the lid is right before using the blender. The blender can be operated safely without your components exploding out of the jar thanks to the lid, which covers the head of the jar. Caps typically come in glass or plastic with rubber stops to create tight seals.
The Blender Base
Your blender’s motor is housed in the base, along with the buttons that control the different settings. It is where you plug in your blender and set your jar to start blending.
The Blade
The blade is the heart of the blender, and its relatively simple device is made of stainless steel. The bottom of your blender has a cross-shaped blade made of two pieces of metal.
The blender’s motor and blade are connected at the bottom by a screw that typically holds the blade in place. The blades will only be helpful if firmly fastened to the motor.
A blender will typically have four blades arranged in different planes. These blades will be positioned to optimize contact with the food as they are being used. Each metal object has an upward or downward slant to its ends.
The Motor
The motor is what drives your blade, and it lives in the base of your blender. Depending on the kind of blender you have, there are different types of motors, and you’ll probably need to remove one at least once.
Understanding the specifics of your blender’s motor is beneficial because it can prevent you from needing to replace the entire appliance.
Tamper
A Tamper is a tool that helps your blender blend through thick ingredients and mixtures by forcing components near the blades while blending.
It resembles a stirring stick and is supported by the blender’s lid allowing it to stir without coming into contact with the blades inside the jar or pitcher. When combining very thick or chunky ingredients, tampers are most helpful.
The Bottom Screw Cap
This component keeps the blades in place while the blender operates, preventing them from cruising off and potentially hurting the user or the blender.
