Carefree of Colorado is known for producing RV awnings. The awnings are popular and are available in different colors. They are one of the best options on the market with relatively cheaper prices. Because of their popularity, there has been an influx of interest from people about why these products are highly coveted.
If you’re in this situation, this article is for you. We’ll demystify the Carefree Awning by providing its part diagram and explaining other important information about the product.
Carefree Awning Parts Diagram
When you check the Carefree Awning, you’ll realize it consists of several different components working together to ensure its functionality. Here’s a diagram showing the different components present in the Carefree Awning.
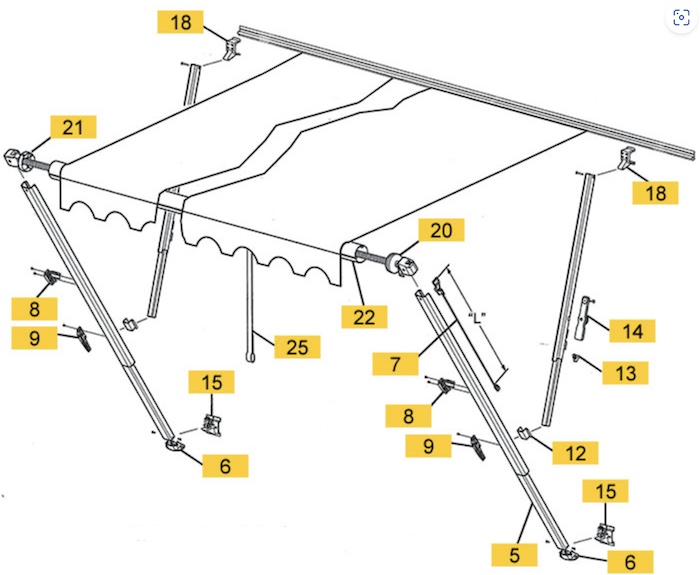
- Main Inner Arm
- Car Port Foot For Main Inner Arm
- Remote Lock
- Travel Latch/ Storage Lock
- Lift Handle
- Brace Slider Assembly
- Locking Knob
- Canopy Clamps
- Bottom Bracket
- Top Bracket
- Spring Assembly
- Spring Assembly
- Awning Pull Down Strap
What follows will be a comprehensive guide to the Carefree awnings as we delve into it and answer some common questions.
Carefree Awning: Everything You Need To Know
Carefree awnings are designed from premium quality vinyl specs available on the market. The brand is known for producing awnings that boast high longevity and durability.
The designs feature bright colors layered with extra fades or stripes on the lower part of the canopies. Conversely, the top part is called the Weatherguard because it helps protect the vinyl from heat, sun, harsh elements, fading, and so on.
Generally, there are different types of Carefree awnings on the market. You’re sure to get a suitable style for yourself from the varieties.
Some common types of Carefree awnings include Manual, Window awnings, Over the door, Power, Lateral arm, Vertical arm, Box patio, and Slideout. We recommend selecting one of these options if you want to try out Carefree awnings.
However, if you fancy a quick and stress-free assembly, you might want to consider the Carefree electric awning. It’s a great option and is also very easy to use. You will only push the button available on the patio switch till the awning is aligned in the desired position.
Carefree Awnings: How To Discover Your Type
It’s often a challenge for some people to decide the type of Carefree awnings they have because of their similarities. The best way to easily identify your type of Carefree is to check the serial number or part number which is usually located on the roller tube.
You should check inside the front cover under the slat. The part or serial number should be found on the deflector under the fabric.
Carefree Awnings: Maintenance Tips
The best way to ensure your Carefree awnings serve you well is to maintain them properly. A good maintenance culture improves its longevity and durability. A great way to maintain your Carefree awning is to clean it frequently, which is simple to do provided you know the right process.
Generally, the process may take some hours to complete so ensure you allocate enough time for the cleaning. Follow the steps below for the right cleaning process:
- Get a spray bottle
- Put one part cleaner to four parts water in the spray bottle.
- You can use dawn dish soap because of its effectiveness. It is also a softer cleaner that won’t harm the fabric of the awning.
- When your awning is unrolled, heavily coat the bottom with your cleaning solution.
- Let the solution sit under your awning for about an hour.
- Reroll your awning and use the hose to clean it.
- Spend a few hours in the sun letting your awning air dry.
This process will ensure you clean your Carefree awnings correctly. If there’s any complication with your Carefree awnings or you need to replace a part, you should endeavor to visit a qualified RV awning for diagnosis.
However, if you fancy a DIY process, we’ve got you. You can replace your Carefree awning part yourself with some simple steps. Follow the steps below for an easy replacement process:
- Remove the set screws that keep the fabric in the mounting track from moving.
- Expand the awning and detach the fixed screws holding the fabric at the roller tube’s ends
- Then, unscrew the bolts holding the roller tube to the awning arms. The bolts usually hold each of their ends
- Wrap the awning arm and clip it against the side of the RV.
- Now, take out the spring. Ensure you count the turns because it will help you to tighten it when replacing it.
- Detach the roller tube from the awning arm and also be bolts and the end cap of the roller tube towards the left side.
- Disconnect the tube’s spring and end cap
- Disconnect the tube’s end cap and spring.
- Use a marker to inscribe A ar the awning’s track before releasing the arms of the awning and detailing the two bolts holding it to the RV
- Spray silicone on a track
- Reverse the steps to rebuild the awnings arm.


